Pimples: To Pop Or Not
The question of whether to pop a pimple or not has been widely debated probably for as long as people have cared about skincare. I’m going to add my advice on top of all the contradictory tips you’ve likely already heard. I speak from decades of experience as someone who has the fortune to have oily skin, which ages slowly but comes with the downside of having the occasional pimple or two.
I’ve gone through teenage years of following conflicting advice and tips from a hundred different magazines, popping pimples that weren’t ready with dirty little fingers and unsterilized tools that look like they belong in an Alfred Hitchcock movie. I’ve suffered the months of trying to cover up post-pimple-popping scars. I’ve even had the dreaded Reindeer Rudolph zit right on the tip of my nose.
I’ve had it all; I’ve tried it all and now, I’m sharing with you what I know is tried, true and tested by yours truly in the world of popping pimples.
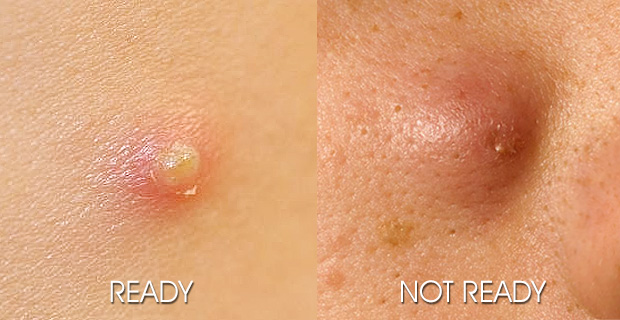
1. First thing to do is examine your pimple. It’s very easy to tell whether a pimple is ready to pop or not, and by this statement, you can clearly note I do advocate popping pimples, but only when it’s ready. As pictured above on the left, a pimple is ONLY ready to pop if it clearly has a white pustule in the middle. If a pimple is simply large and red, as pictured on the right, you do NOT want to touch it. If it’s white, it’s right.
2. Make sure you pop a pimple only at night before bedtime so you don’t expose the open pore to environmental dirt outside. This way, you’ll also give it a chance to heal overnight. You can either steam your face for a few minutes (over a pot of simmering water, preferably with a few drops of essential oils in it) or the simplest method- soak a small towel in hot water and place it over the pimpled area on your face for a few minutes.
3. Make sure your hands and nails are clean (check under your nails as they are a breeding ground for bacteria). Wrap the forefingers of both your hands with large cotton pads or cotton balls. Alternatively, you can fold a tissue twice-over and wrap that around each forefinger. The reason for using a thick material like cotton or folding the tissue over twice is that you want to make sure that when you place pressure on the pimple, you’re not digging into your skin with your nails.
4. Place your wrapped forefingers on either side of the pimple and gently but firmly squeeze until you see the white pustule pop out. Along with it will ooze out some trickle of blood. This is normal. I won’t lie to you- when you first squeeze the pimple, it does hurt but as soon as it pops, the pain is gone, along with all that gross bacteria. Some people bleed just a little, some may take a couple minutes before the blood stops. Either way, let it all come out.
5. Finally, once the blood has either completely stopped or slowed significantly, wash the area with very cold water. Then follow by rubbing an ice cube on it to close up the open pore/wound. Apply your usual toner and moisturizer. The next morning, rub an ice cube again for a minute or so to make sure your pores stay nice and tight before leaving the house. Do the ice routine every morning for a few days until you see that the area has healed well. Make sure to keep moisturizing as it’s important to help the healing process.
I’ve found that leaving a pimple with that clearly marked white pustule unpopped just lets all that bacteria fester under the skin only to resurface weeks later. These pimples are a very different breed from the painful, red bumps that you don’t ever want to squeeze.
 Welcome to Food, Travel & Life with The Asian Fusion Girl. Learn more about the AF Girl and her various projects


